891ctrl
CAT control & browser interface for the Yaesu FT-891 transceiver.
The application (no installation necessary) runs from a single JAR file (Java Archive). It connects to the 891 via USB CAT and opens a network port for the browser interface.
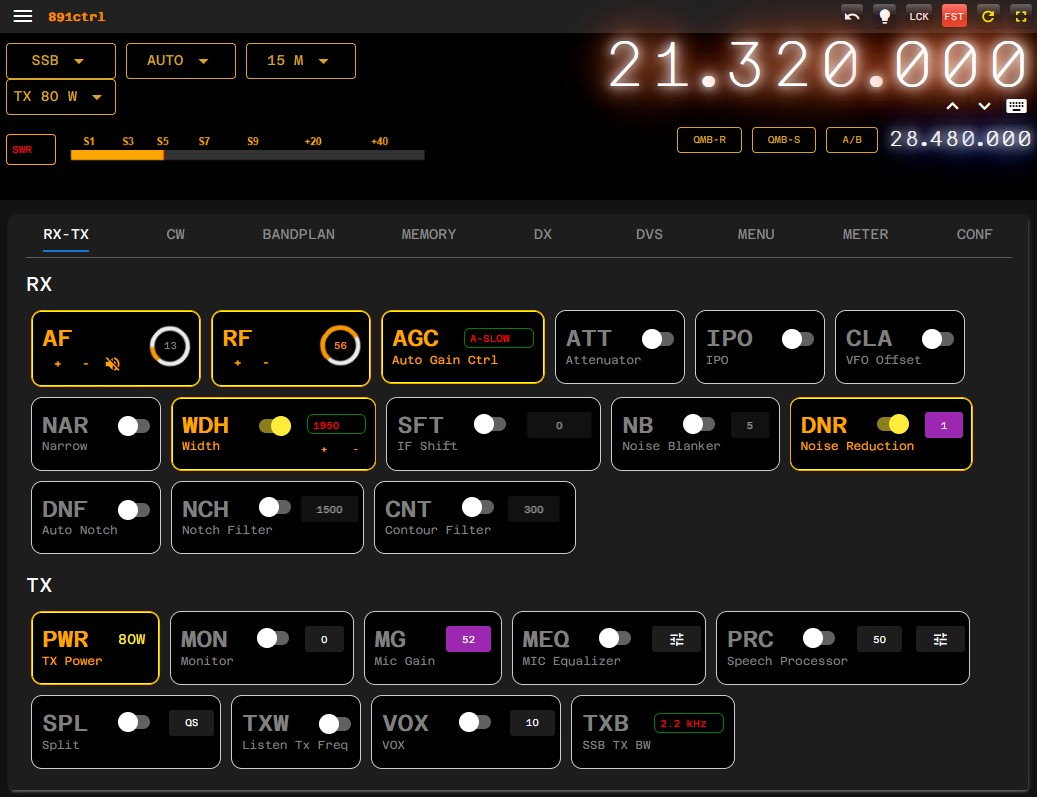
Main features
- rx/tx controls
- bandplan
- menu editor
- graphical microphone equalizer
- DVS
- panadapter integration
- DX/SOTA/POTA cluster
- Logger
Supported platforms
- All platforms with Java 21+ which are supported by the jSerialComm library (see here)
- Modern web browser required (Firefox recommended)
Tested on:
- Lenovo x64 Windows 10/11, Mint Linux
- Raspberry Pi3 / Pi400 (Raspberry Pi OS)
- MacBook Air M1 / Mac Mini M4
Raspberry Pi Info
Pi Zero or older:
Not supported. Java 21 for ARMv6 is not available on Raspberry Pi OS
Pi Zero 2:
Supported but not recommended. Apparently the Pi Zero 2 creates strong RFI on the USB connection (You can even hear the linux boot sequence in the radio). I tried shielding, USB isolator and clip-on ferrite cores on the cable without any luck. The Pi3 and Pi400 do not show this problem. Also see here
Download
Non-commercial, personal use only. This software is in beta state. Use at your own risk.
[releases built by github actions]
| Date | # | MD5 | Notes |
|---|---|---|---|
| 13.03.26 | 149 | f4c9ca8c88313fbc252f1829290148f7 | -> Maintenance release (Java 25 support) |
Previous versions
| Date | # | MD5 | Notes |
|---|---|---|---|
| 07.01.26 | 148 | 8fbc78b3f1d9d2b4e27ad4c3b483b9d1 | -> Waterfall feature (experimental) |
| 04.10.25 | 147 | 16dcdf602d350e598b3af46825e71149 | -> DNF default values -> RX/TX overlay toggle |
| 28.07.25 | 146 | 80b3886fde9579c538e2722cd9f9c91e | -> POTA cluster integration |
| 18.07.25 | 145 | f7b2797f2b6b3bb97a343788254709fd | -> Logger feature |
| 15.07.25 | 143 | d09c1222ed91a681709e0d636a5581a0 | -> UI 'light mode' toggle |
| 11.07.25 | 142 | 49f5d93cd7d8bcd8c9d8a783952abaa1 | -> DX/SOTA cluster feature |
| 09.06.25 | 141 | 1af26a4441626fe94e3dabd6dd1ad6f8 | -> WDH default values -> CLAR control |
| 03.06.25 | 140 | fbad52871b56538b5a667fe2b2628bc1 | -> fixed layout problem |
| 03.06.25 | 139 | 41a81396789a741ac8948115e1f667d3 | -> default values feature |
| 21.04.25 | 138 | 4f9894c48d583214d3fccb83d16c0a74 | -> bugfixes & improvements -> menu data import/export |
| 12.03.25 | 132 | fc09be14a21d7f08722028b73f6e2ee6 | -> S-Meter -> improved layout for mobile |
| 10.03.25 | 131 | 9b9eecba8059e5ff8334e760606a9526 | -> CW feature panel -> [IF-Shift] control |
| 07.03.25 | 130 | 3de1aed9241cf93b4a2b8cf80671e1f1 | -> region 2 bandplan -> cyberpunk theme |
| 03.03.25 | 125 | 84436037658a8c7da9fd0da48e525a31 | -> Panadapter integration |
| 28.02.25 | 123 | 7844dd17d4efabdcf2e56df33fc8fbcb | -> RF meter plot fixed |
| 27.02.25 | 122 | 9258c1948f5aac7c8d4801caf5b3786b | -> Notch Filter -> UI fixes |
| 26.02.25 | 121 | a6836ce88cb61291f70de7d0d60e576c | -> TX Bandwidth control -> Quicksplit button |
| 26.02.25 | 119 | 970f5f1f8337fbcbf3bd044cef9abe30 | -> menu bug fixed |
| 25.02.25 | 118 | decd0fbbcac709473214b63d375ca821 | -> added FLRig emulation |
| 18.02.25 | 116 | 56dd18d2be909899de57e4930b3df2be | -> first release |
Installation
You will need Java version 21 or higher
- Linux: install via package manager (e.g. openjdk-21-jre/openjdk-21-jdk package)
- or OpenJDK build from Adoptium (Windows/Linux/macOS) https://adoptium.net/temurin/releases
- or OpenJDK build from Microsoft (Windows/Linux/macOS) https://learn.microsoft.com/en-us/java/openjdk/download
The JRE (runtime environment) version is a much smaller download than the JDK and is sufficient to run the application.
TIP
Make sure to have the correct java version in your search path:
bash
java -versionConfiguration
IMPORTANT
Serial Port speed in the 891 menu must be set to 38400 bps!
Configure CAT RATE setting in the 891 menu:
05-06 CAT RATE 38400 bps
Windows: Make sure to have the Yaesu USB COM port drivers installed.
Linux: Check the Advanced section.
If you need additional installation instructions or a general overview, check out the youtube videos from Kyle - AA0Z and IU8QTM Radio Trails (Warning: youtube switched to automatic audio track translation by default. This means that you might listen to an artificial fake voice - make sure to disable audio translation if your want to hear the original voice tracks (english and italian))
Run application
Extract the downloaded zip file and run the application from the command line:
bash
java -jar 891ctrl.jarAfter the application started, open the interface in your browser:
Configure the com port on the settings page:
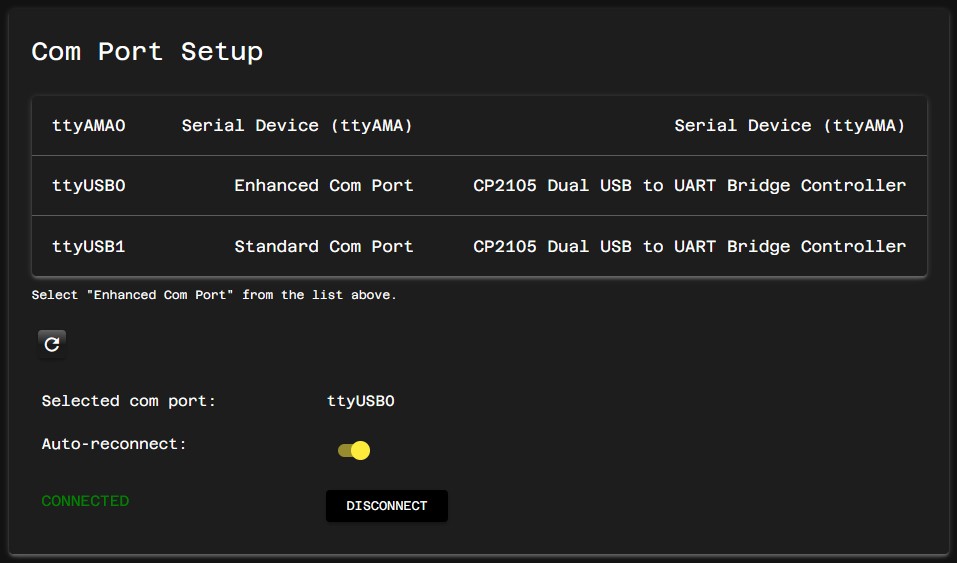
Select the Enhanced Com Port in the table. The application will write the settings to a file 891ctrl.properties and use this configuration on next startup.
On successful connect the 891 LCD screen will blink.
Feature description
Bandplan
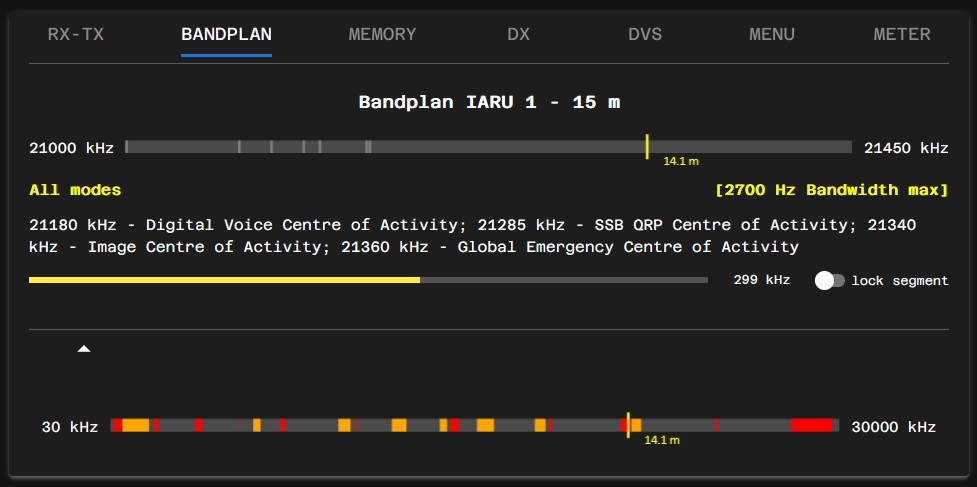
Displays information for the current band and frequency. Click on the bar to change your VFO. lock segment will keep your VFO within the boundaries of the current part of the bandplan. The second bar shows overview over the full sw spectrum: red color are amateur radio bands, orange color are radio broadcast SWL bands. Bandplan region can be changed in the config panel.
Menu Settings
Allows to edit the configuration data for all menu settings of the 891.

Red value indicates non-default setting for this entry. Bookmark an entry with the star icon. The bookmarks toggle on top lets you filter just for bookmarked entries. Search for a specific setting with the text box entry. When changing menu settings directly in the 891, make sure to reload the data with the Load button. There is no automatic sync from rig to 891ctrl.
There are two buttons below the menu table that allow to export and import all menu settings to CSV. The data will be exported to a subdirectory menu-export of the working directory and can be reimported from there (you can rename the exported files if you like). If you enable full export the process will export all the menu settings, otherwise only entries that differ from the factory defaults will be included.
You can also have some kind of incremental import: edit the exported file and remove all lines that you don't want to change during the import. E.g. you could have two small import files for data or voice operation, which would only adjust some settings for these scenarios.
Memory
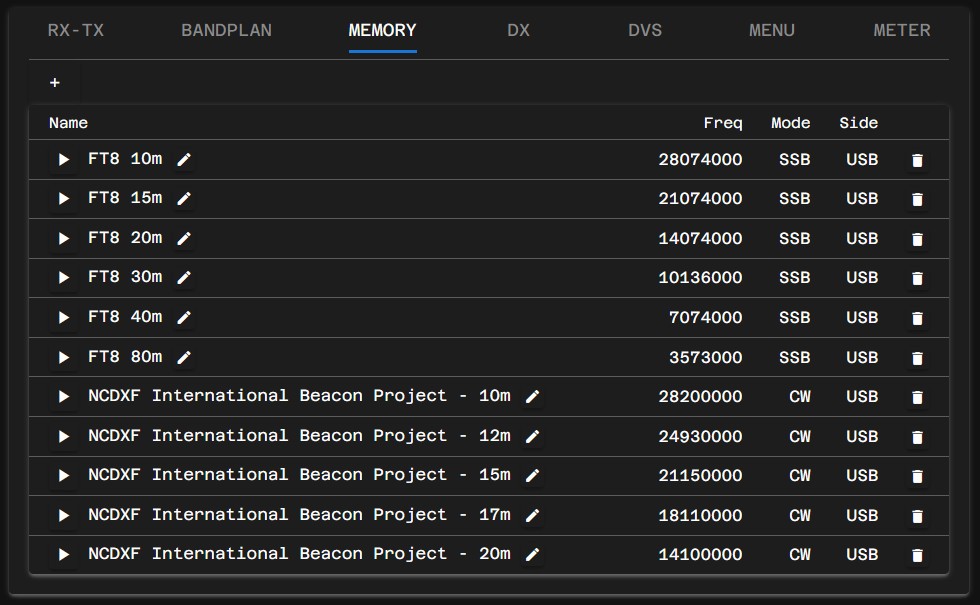
Just a simple frequency store. All entries are stored in localstorage of the browser (and might be removed during version upgrade, sorry). There is no integration to the frequency store of the 891. Use the + button on top of the table to add the current frequency. Use the play button to load frequency and mode into VFO.
Meter
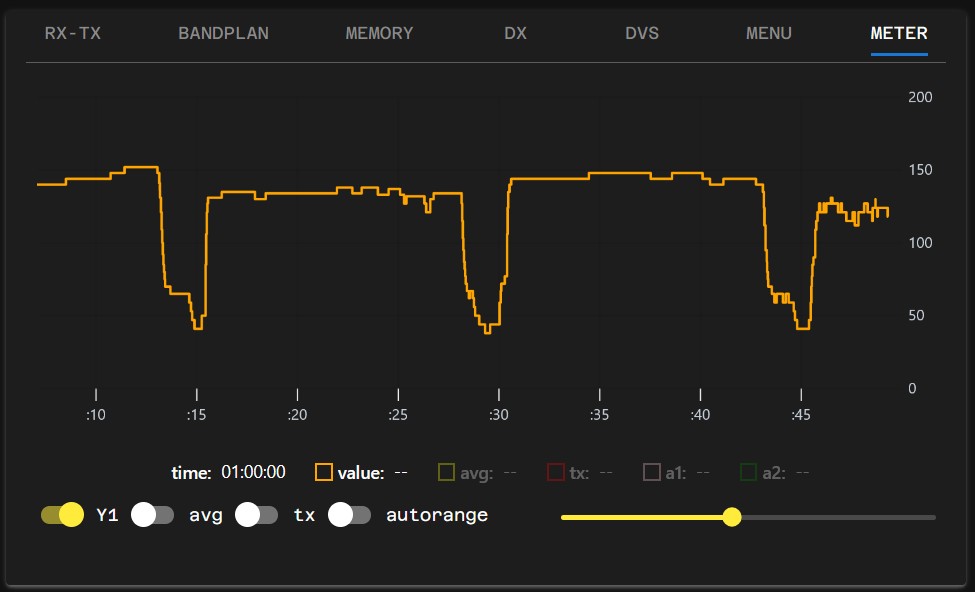
Prototype for visualization of the RF level meter. Screenshot shows FT8 signals.
DVS

Allows you to use the DVS Voice Memory feature without the FH-2 Remote Control Keypad. Make sure to read the general feature description of DVS in the 891 Advance Manual first.
Important
In order to use the internal voice keyer of the 891 make sure to enable the REC SETTING screen:
Menu 05-11 REC SETTING - Set to ENABLEThe PB option toggle on the REC screen is important when using the DVS feature:
- Disabled: Play recording via monitor
- Enabled: Transmit the recording & Monitor Playback
Unfortunately it seems not possible to toggle PB via CAT, so you have to do this manually.
It is recommended to assign the PB option from the REC screen to one of the A/B/C function keys when using this feature.
Numbers
Select the DVS slot for playback or recording
FAST button integration
Use the FST button on the 891 microphone to start and stop the playback
Record
Click RECORD button and press PTT to start the recording for the currently selected DVS slot. Click the STOP button to stop the recording. TIP: Instead of PPT use VOX to start record to avoid the PTT click sound on the recording when using the stock microphone.
Microphone Equalizer
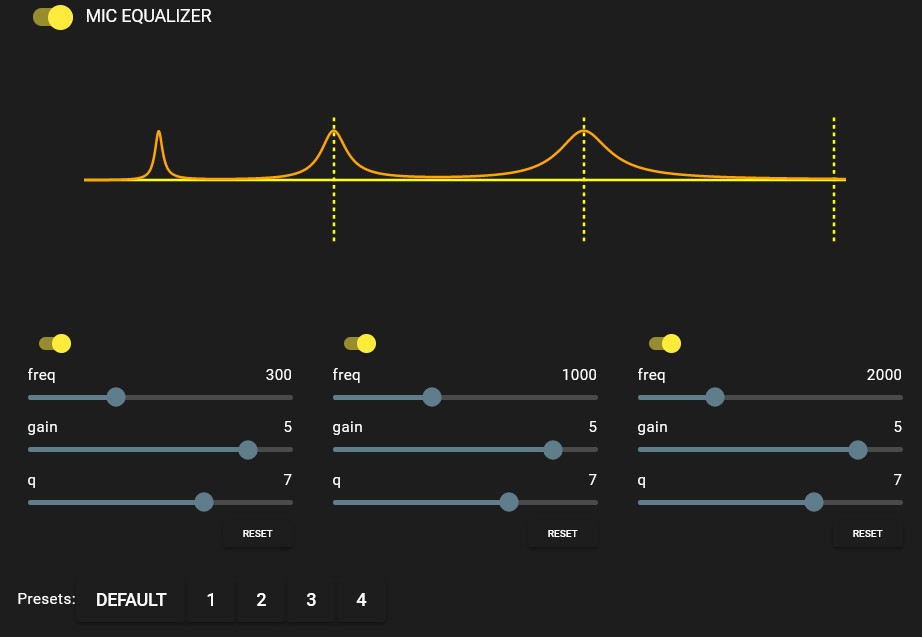
This popup is available for the mic equalizer and speech processor. The dotted lines are markers for 1,2,3 kHz. Presets are recommended values from various posts which I found in the internet.
My experience after some SSB listening tests with the 891 (+attenuator) connected to a rx-SDR: There is almost no audible improvement of the signal when using the EQ with the stock microphone. However, it is easy to build a microphone adapter (see here) and connect a proper microphone (I tested with a Zoom H1 microphone and it really improves modulation). I mostly do portable operation right now - so I do use the stock microphone anyway and don't care about the Mic EQ.
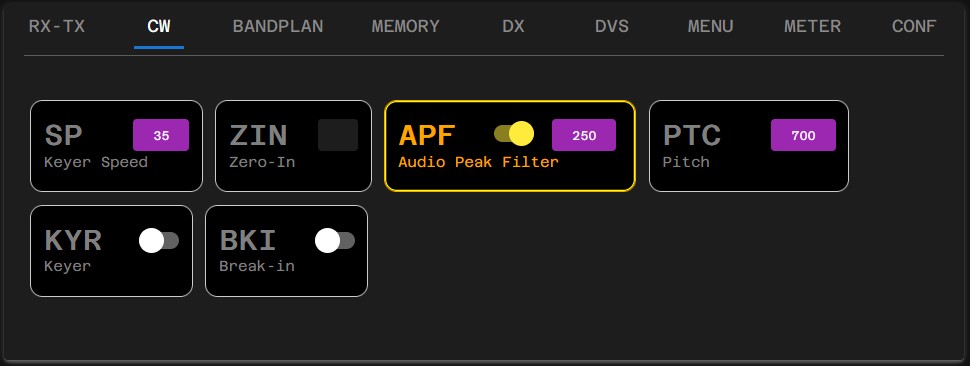
CW
Battery estimation
There is a battery icon in the header bar with an estimation of remaining battery capacity. Click on the icon to reset. The calculation is based on the measured time of the 891 being either in RX or TX mode (SSB only). This feature is in alpha state.
To enable the feature, create a file application.properties in the working directory of the application:
bash
feature.battery=trueAdditionally the feature needs to be enabled in the config panel of the UI.
FLRig emulation
A simple FLRig XMLRPC endpoint in 891ctrl allows to connect FLdigi & WSJT-X. Supported operations: frequency, mode & split operation. CAT PTT is not supported (yet), you will have to use VOX or serial PTT.
WSJT-X
- Settings -> Radio -> Rig select "FLRig".
- In field "Network Server" enter localhost:8910
- Split operation is supported
- Tested with version 2.7.0
FLdigi
- Configure -> Config Dialog -> Rig Control -> flrig
- check "Enable flrig xcvr control with fldigi as client"
- addr: 127.0.0.1 Port 8910
- Tested with version 4.2.0.6
I use the xggcomms Digimode-3-Yaesu connector for digi modes - it works well on windows and linux.
Panadapter integration
891ctrl can connect to a rigctl server for panadapter integration. You just need a T/R switch (I use the MFJ-1708B-SDRS) and a SDR stick.
The integration was optimized to work with SDR++ (sdrplusplus). This opensource multiplatform application supports various SDRs (I use RTL-SDR Blog V4 and SDRPlay RSP-1A). You don't need to install any additional rigctl software, 891ctrl will connect to the application directly.
I tested the feature for portable operation (Pi 400 with a small hd screen). It works nicely.
To enable the integration, create a file application.properties in the working directory of the application and add the line feature.rigctl=true
Details
bash
# enable rigctl
feature.rigctl=true

# default ip is localhost
#rigctl.ip=localhost

# optional second ip for portable operation
#rigctl.ip2=localhost

# optional port
#rigctl.port=4532

# poll interval in seconds (sync freq from sdrpp to 891ctrl)
# 0 to disable polling. 1 is default
#rigctl.poll_interval=1
Start the Rigctl Server Module in SDR++ (enable in the Module Manager if not visible):

When the feature is enabled in application.properties, 891ctrl it will try to connect to rigctl.ip when starting. The UI will display a red icon with two horizontal arrows in the header bar on successful connect. This indicates that the application is connected to SDR++ and the feature is active. When you click the icon it will turn yellow, indicating that the sync is paused. This is helpful when you want to scan on SDR++ but keep the 891 on frequency.
The feature supports bidirectional frequency synchronization:
- 891 -> SDR++ : Frequency and Mode are synchronized in realtime. Bandwidth sync is not supported
- 891 <- SDR++ : 891ctrl is polling the frequency from SDR++ in one second intervals. You can disable this direction by setting the application property to zero. There is a five seconds delay after initial connect before this sync direction is enabled (to prevent update problems). Mode or bandwidth sync is not supported.
DX/SOTA/POTA cluster
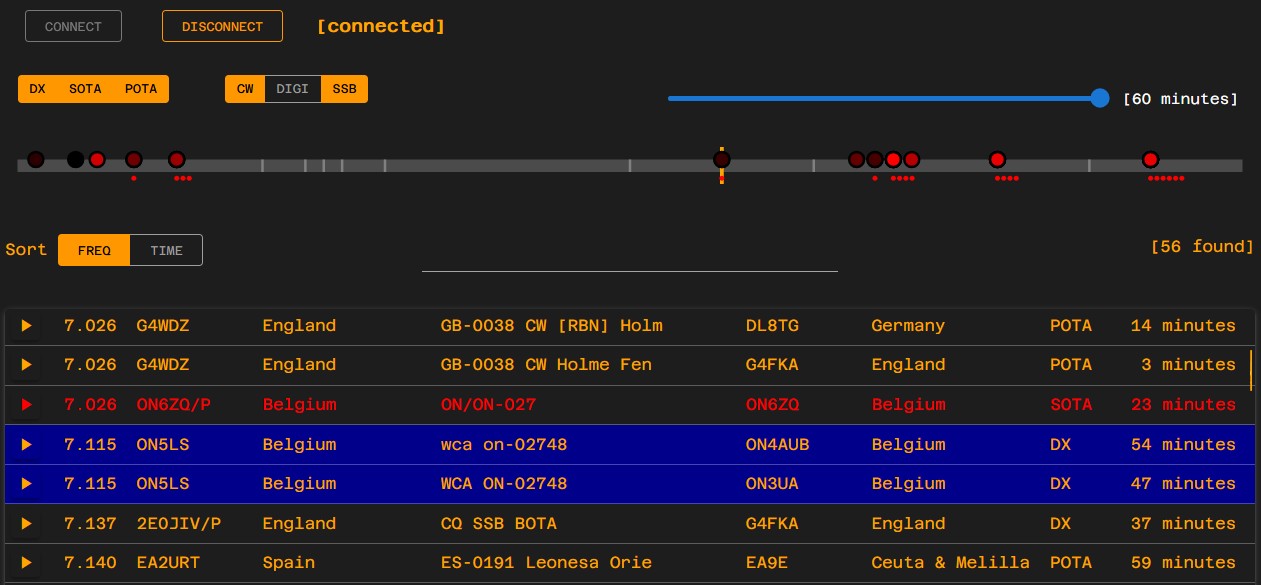
The feature relies on the datastream from my dxclustermap service. It displays DX, SOTA and POTA entries for the current band. You can filter by cluster type, bandplan segment and time.
The frequency bar gives an overview of the spot distribution on the band. Spot color is bright red when it is new, it will turn darker as the entry gets older. The smaller dots indicate that there are multiple entries for this frequency. Hover over a spot to get a detail tooltip. Click on the spot or anywhere on the bar to change the VFO.
The table view can be sorted by frequency or time. SOTA entries are red color. The entries close to your VFO frequency will be colored blue. Click on the row to display details (SOTA entries are linked to SOTLAS, POTA entries linked to pota.app). Click on the play icon to change VFO. The text entry input lets you filter the table in the text, dx and dx de columns.
Logger
This feature is in beta state
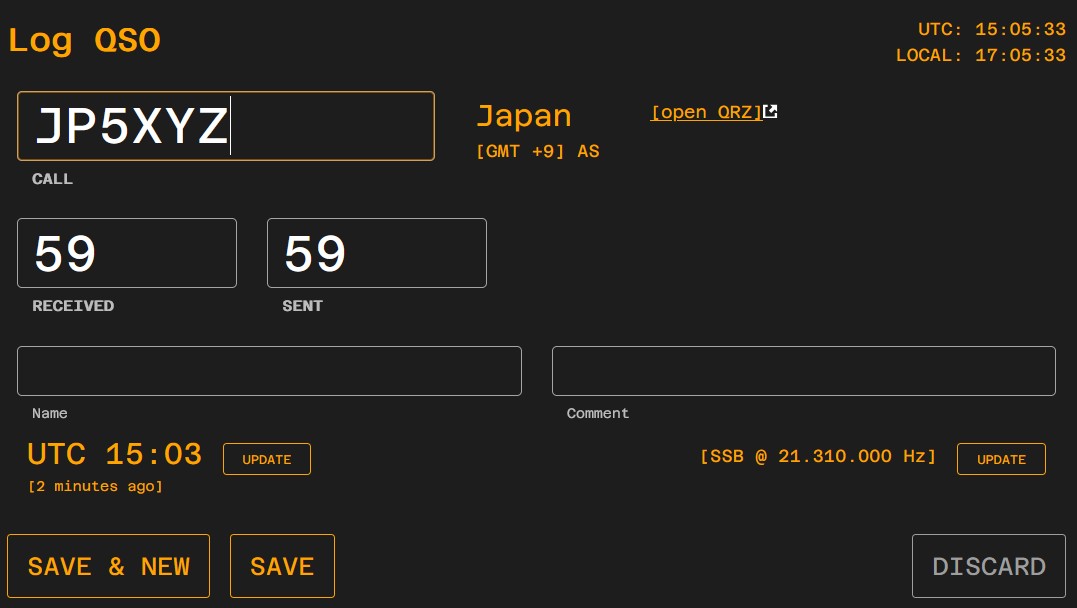
A simple logger. Contains CTY.DAT data for callsign country lookup (including display of timezone and continent). Input fields can be navigated with tab key. On smaller android tablets it is recommended to use an external bluetooth keyboard - and disable the onscreen keyboard. By switching to fullscreen and hiding the top panel (icon in header bar) the logger page should fit on the screen when in landscape mode.
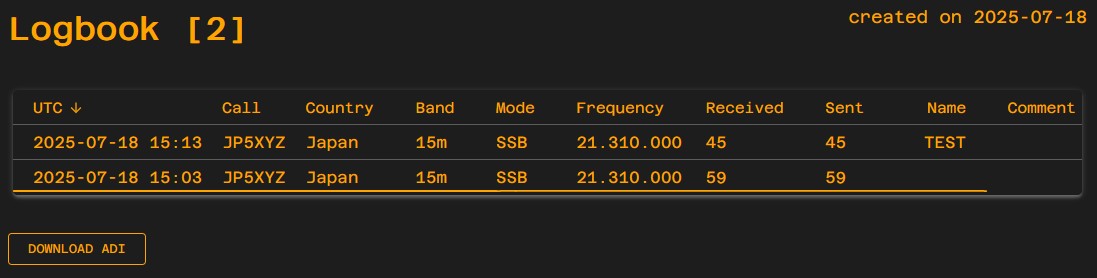
The logbook is stored in subdirectory /logbook of the working directory of 891ctrl. It contains two files: logbook.json and logbook.adi. The json file data is used to display the table data and the adi file can be imported to e.g. QRZ. You can either use the file from the directory or download it from the UI. If you want to start a new logbook, just remove/rename both(!) files. The application will create new files automatically.
Default values
The 891 resets certain filter values after a band change. The values of these controls can be restored to a default value automatically.
The feature needs to be enabled in the config panel of the UI. A new icon will appear in the header bar. The monitoring of the values is performed by the browser process so you need to keep the browser window open.
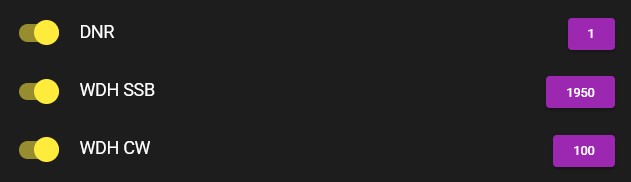
Warning: Apparently there is a firmware bug in the 891 CAT interface which at some point will start to report wrong WDH values when you change WDH / toggle NAR often in a row.
When the rig gets into this corrupted state it will always report the same WDH value (no matter what if you change it from the rig or via CAT). Since this would create an endless loop of the restore feature, the UI will try to detect this and give an error warning.
Usually it helps to press 'A/B' twice to recover the rig from this state.
You can also observe this bug on the rx panel: You will not be able to change WDH from the UI anymore (sometimes with NAR enabled, sometimes disabled). The rig simply doesn't accept the SH CAT command anymore, you will see something like Could not parse: [?] - Q=NA00;SH0114 in the logs.
If you know a proper workaround for this problem please let me know.
Waterfall
A simple attempt to add waterfall capabilities to the 891 without any additional hardware or software. It works like a radar sweep: reading the S-Meter values on the current frequency and plotting them on a spectrum view. In combination with the scan feature of the 891, you can get an overview of the band activity.
This feature is in experimental state
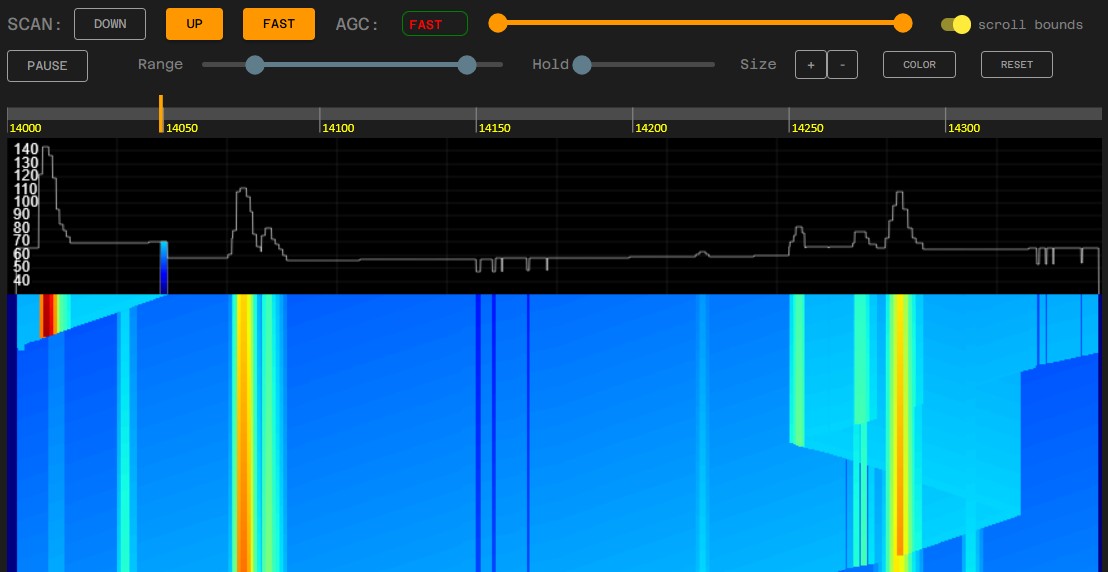
The min & max frequency is set to the current bandplan boundaries by default and can be zoomed with the orange range slider on top. When the scroll bounds toggle is enabled, the application will reset the current frequency in case you cross the bounds, so you can scan continuously.
You can either use the VFO dial to manually scan over a certain area, or use the 891 scan feature. Make sure to enable FST on the 891 for a fast scan. Use the VFO dial to change direction while scanning, and use the CLAR button to stop the scan.
Check these settings in the advance manual in case you want to control the scanning from microphone:
0515 MIC SCAN           0: DISABLE 1: ENABLE
0516 MIC SCAN RESUME    0: PAUSE 1: TIME
Note: If you have "Tab panels keep-alive" checked in config settings, the frequency scroll boundaries reset will be performed even if the panel is not visible. Use with caution.
Advanced
Other options
If you run the browser interface on an older slow tablet or similar, you might want to disable the meter bar. This will avoid the frequent re-rendering of the meter display component in the browser (especially when using fast AGC) and also reduce network bandwidth usage.
To disable the meter, create a file application.properties in the working directory of the application:
bash
feature.disable_meter=trueTo display the CAT communication in the log, add this property:
bash
serial.log=true(RM will not be logged to prevent flooding of the logs)
Additional Linux install instructions
Serial port access is limited to certain users and groups in Linux. Make sure your user is in the dialout group. On Raspberry Pi OS this group should be assigned by default.
bash
# check if user is in group:
groups <username>

# if you do not see the dialout group, add it to your user.
# >>>  make sure to logout and login again for the changes to become effective!
sudo usermod -a -G dialout <username>
Without the correct group assignment you might still be able to see the ports - but you will be unable to connect. Depending on your distro you might need additional user groups. More information here (Paragraph 2). Note that on recent Linux distros (e.g. Mint) there might be problems caused by brltty which is installed by default and needs to be removed (see here). For testing purposes you can also try to run the application with sudo to determine if any connection problems are caused by user group permission issues.
Manual com port configuration
Check the application startup log for the list of available serial ports:
bash
...
SerialService    : name=COM3 | systemPortPath=\\.\COM3 | portLocation=0-0.4 | portDescription=Enhanced Com Port | descriptivePortName=Silicon Labs Dual CP2105 USB to UART Bridge: Enhanced COM Port (COM3)
SerialService    : name=COM4 | systemPortPath=\\.\COM4 | portLocation=0-0.5 | portDescription=Standard Com Port | descriptivePortName=Silicon Labs Dual CP2105 USB to UART Bridge: Standard COM Port (COM4)
...
Edit 891ctrl.properties file to configure the serial port (Enhanced Com Port).
bash
# windows
serial.comPortName=COM3

# linux
#serial.comPortName=ttyUSB0
Setup as systemd service
You can create a systemd service if you want to start 891ctrl automatically on boot. This allows you to run the application headless on a raspberry pi.
Also see section 'Setup WIFI hotspot access for portable operation'.
The following instructions assume your username is pi and the application is extracted to /home/pi/891ctrl . Adjust user home directory and installation directory if necessary.
Create a file 891ctrl.sh in directory /home/pi/891ctrl/ :
bash
#!/bin/bash

/usr/bin/java -jar 891ctrl.jar > app.log 2>&1
Make it executable:
bash
chmod +x 891ctrl.shCreate a file 891ctrl.service :
bash
[Unit]
Description=891ctrl
After=network.target

[Service]
ExecStart=/home/pi/891ctrl/891ctrl.sh
Restart=always
WorkingDirectory=/home/pi/891ctrl

[Install]
WantedBy=multi-user.target
Install the service :
bash
# install service file
sudo cp 891ctrl.service /etc/systemd/system/891ctrl.service

# enable / disable service (autostart)
sudo systemctl enable 891ctrl

# start / stop / restart service
sudo systemctl start 891ctrl

# check service status
systemctl status 891ctrl
Check the logs:
bash
tail -f -n 200 /home/pi/891ctrl/app.log
The HTTP server binds to the local network interface by default. You can customize this by adding a file application.properties to the local directory.
bash
# bind to all interfaces
server.address=0.0.0.0
WARNING: There is no access control, so make sure you do not expose this interface to the internet! This feature is not intended to be used for remote operation.
Setup WIFI hotspot access for portable operation
You can configure the Raspberry Pi to run 891ctrl completely headless for portable operation. This setup was tested on Android 9.
First make sure 891ctrl is starting automatically and the server is configured to bind to all interfaces (see section 'Setup as systemd service').
Open a wlan hotspot on your phone and have the wireless adapter of the Raspberry Pi connect to this hotspot
Add new connection:
bash
sudo nmcli connection add type wifi con-name "HOTSPOT" ifname wlan0 ssid "<SSID>" wifi-sec.key-mgmt wpa-psk wifi-sec.psk "<PASSWORD>"

# check if connection was created
nmcli connection show

# Ensure autoconnect is enabled
sudo nmcli connection modify "HOTSPOT" connection.autoconnect yes

# Set the autoconnect priority. Number greater than 0 will give priority over default wlan connection
sudo nmcli connection modify "HOTSPOT" connection.autoconnect-priority 100

# check connection details
nmcli connection show "HOTSPOT"
You might need to reboot the pi so it connects to the hotspot network on boot.
The hotspot feature of your phone should now show the IP address of the Raspberry Pi. Use this IP to connect to the UI.
About this project
I bought the FT-891 as my first rig in 2022 while I was learning for the test. The filter settings, menu structure etc. seemed pretty complicated to operate. Found the excellent CAT documentation from Yaesu and started to write this tool just for fun.
[2025] by DO1ZL. contact via callsign @gmx.net or on the 15 meter band 73!
Suggestions or bugs please report here groups.io topic
Links
- [Yaesu] FT-891 Operating Manual
- [Yaesu] FT-891 Advance Manual
- [Yaesu] FT-891 CAT Reference
- [N4NRV] Hints and Kinks of the Yaesu FT-891
Technology & Library credits
Kotlin, Spring Boot, jSerialComm, Vue.js, VueUse, Pinia, Quasar, RSocket, vue3-rsocket, Konva.js, uPlot, waterfall, Icon by Freepik - Flaticon